


 |
| Error code 1603 Message |
Symptoms of Error 1603
The various symptoms of the error 1603 are:- The setup of the Exchange Server 2013 update fails once the Remove Exchange files procedure is finished.
- The setup process cannot be restarted.
Reason behind Error 1603
The main reason due to which the installation of the update rollup or service pack fails is that the Group Policy Object or Local Group Policy has been applied with the help of Windows PowerShell script policy. The Group Policy Object mainly defines one of the two policies: Machine Policy and User Policy. Whenever Exchange 2013 RU1 or RU2 is run, the installer is stopped and the Windows Management Instrumentation (WMI) is also disabled.Resolution for Error 1603
The only workaround to remove the Error 1603 is temporary removal of MachinePolicy and UserPolicy from the ExecutionPolicy. The whole procedure involves two processes, first is to determine the policy that has been defined in the ExecutionPolicy and the second is to disable the defined policy.-
Determine The Defined Policy
For determining which policy has been defined, follow the below-mentioned steps:
- Click the Start button and select Command Prompt. Right click on Command prompt and select Run As Administrator option.
- In Command Prompt, type mmc command and press Enter.

mmc in Command Prompt - In the Console Root window, click on File option and select Add/Remove Snap-in option.

Console Root Window - From the list of Snap-ins select Computer Management and click on Add option.

Computer Management - Click on OK.
- Select Local Computer option and click on Finish.

Select Local Computer - Click on Ok.
- Expand Computer Management option, then expand Service and Applications and then select Services option.

Service and Applications - In the Startup type select Automatic.
- Click on Apply and then OK.
- Close Microsoft Management Console window.
- Click Start, select Accessories and click on Windows Powershell folder and select Windows Powershell option.
- In the command prompt, type the command get-executionpolicy –list and press enter.

Command get-executionpolicy-list - All the policies and their status will be shown. In this case, MachinePolicy has been defined.

All Policies with Status
Disabling The Defined Policy
With the help of above-mentioned procedure, we successfully found out that Machine Policy has been defined in the. In order to disable the defined policies, follow the below-mentioned procedure:
- Click the Start button and select Command Prompt. Right click on Command prompt and select Run As Administrator option.
- In Command Prompt, type mmc command and press Enter.

mmc command in Command Prompt - In the Console Root window, click on File option and select Add/Remove Snap-in option.

Console Root - Select Group Policy Object Editor and click on Add option. Click Ok.

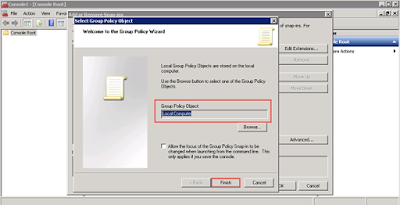
- In the Group Policy Object field, select Local Computer and Finish.
Group Policy Object Field - Depending on the type of policy defined, proceed with the next steps:
- For Machine Policy
- Expand Local Computer Policy, then expand Computer Configuration.

Computer Configuration - Then expand Administrative Templates and Windows Components and select Windows Powershell option.

Administrative Templates & Windows Components - Right click on Turn On Module Logging and select Edit option.

Turn on Module Logging - Enable Not Configured option, click on Apply and then select Ok.
- Expand Local Computer Policy, then expand Computer Configuration.
-
For User Policy
-
Expand Local Computer Policy, then expand User Configuration.

User Configuration - Then expand Administrative Templates and Windows Components and select Windows Powershell option.

Select Windows Powershell -
Right click on Turn On Module Logging and select Edit option.

Edit Turn on Module Logging - Enable Not Configured option, click on Apply and then select Ok.
-
Expand Local Computer Policy, then expand User Configuration.
- For Machine Policy


[location of Exchange update rollup]\bin\ServiceControl.ps1 AfterPatch
Install Exchange 2013 update rollup.


0 comments:
Post a Comment
Post a reply